> ## Documentation Index
> Fetch the complete documentation index at: https://wb-21fd5541-feature-automate-reference-docs-generation.mintlify.site/llms.txt
> Use this file to discover all available pages before exploring further.
# Pii
이것은 인터랙티브 노트북입니다. 로컬에서 실행하거나 아래 링크를 사용할 수 있습니다:
* [Google Colab에서 열기](https://colab.research.google.com/github/wandb/weave/blob/master/docs/notebooks/pii.ipynb)
* [GitHub에서 소스 보기](https://github.com/wandb/weave/blob/master/docs/notebooks/pii.ipynb)
##
# PII 데이터와 함께 Weave를 사용하는 방법
이 가이드에서는 개인 식별 정보(PII) 데이터를 비공개로 유지하면서 W\&B Weave를 사용하는 방법을 배웁니다. 이 가이드는 PII 데이터를 식별, 수정 및 익명화하는 다음 방법을 보여줍니다:
1. **정규 표현식**을 사용하여 PII 데이터를 식별하고 수정합니다.
2. **Microsoft의 [Presidio](https://microsoft.github.io/presidio/)**, 파이썬 기반 데이터 보호 SDK. 이 도구는 수정 및 대체 기능을 제공합니다.
3. **[Faker](https://faker.readthedocs.io/en/master/)**, PII 데이터를 익명화하기 위해 Presidio와 결합된 가짜 데이터를 생성하는 Python 라이브러리.
또한 다음을 사용하는 방법을 배웁니다 *`weave.op` 입력/출력 로깅 사용자 정의* 및 *`autopatch_settings`* PII 수정 및 익명화를 워크플로우에 통합합니다. 자세한 내용은 [로깅된 입력 및 출력 사용자 정의](https://weave-docs.wandb.ai/guides/tracking/ops/#customize-logged-inputs-and-outputs)를 참조하세요.
시작하려면 다음을 수행하세요:
1. 다음을 검토하세요 [개요](#overview) 섹션.
2. 다음을 완료하세요 [전제 조건](#prerequisites).
3. 다음을 검토하세요 [사용 가능한 방법](#redaction-methods-overview) PII 데이터를 식별, 수정 및 익명화하기 위한.
4. [Weave 호출에 방법 적용](#apply-the-methods-to-weave-calls).
## 개요
다음 섹션에서는 다음을 사용한 입력 및 출력 로깅에 대한 개요를 제공합니다 `weave.op`, 그리고 Weave에서 PII 데이터 작업에 대한 모범 사례.
### 다음을 사용하여 입력 및 출력 로깅 사용자 정의 `weave.op`
Weave Ops를 사용하면 입력 및 출력 후처리 함수를 정의할 수 있습니다. 이러한 함수를 사용하여 LLM 호출에 전달되거나 Weave에 로깅되는 데이터를 수정할 수 있습니다.
다음 예제에서는 두 개의 후처리 함수가 정의되어 다음에 인수로 전달됩니다 `weave.op()`.
```python
from dataclasses import dataclass
from typing import Any
import weave
# Inputs Wrapper Class
@dataclass
class CustomObject:
x: int
secret_password: str
# First we define functions for input and output postprocessing:
def postprocess_inputs(inputs: dict[str, Any]) -> dict[str, Any]:
return {k:v for k,v in inputs.items() if k != "hide_me"}
def postprocess_output(output: CustomObject) -> CustomObject:
return CustomObject(x=output.x, secret_password="REDACTED")
# Then, when we use the `@weave.op` decorator, we pass these processing functions as arguments to the decorator:
@weave.op(
postprocess_inputs=postprocess_inputs,
postprocess_output=postprocess_output,
)
def some_llm_call(a: int, hide_me: str) -> CustomObject:
return CustomObject(x=a, secret_password=hide_me)
```
### PII 데이터와 함께 Weave를 사용하기 위한 모범 사례
PII 데이터와 함께 Weave를 사용하기 전에 PII 데이터와 함께 Weave를 사용하기 위한 모범 사례를 검토하세요.
#### 테스트 중
* PII 감지를 확인하기 위해 익명화된 데이터 로깅
* Weave Traces로 PII 처리 프로세스 추적
* 실제 PII를 노출하지 않고 익명화 성능 측정
#### 프로덕션 환경에서
* 원시 PII를 절대 로깅하지 마세요
* 로깅 전 민감한 필드 암호화
#### 암호화 팁
* 나중에 복호화해야 하는 데이터에는 가역적 암호화 사용
* 역변환이 필요 없는 고유 ID에는 단방향 해싱 적용
* 암호화된 상태로 분석해야 하는 데이터에는 특수 암호화 고려
## 전제 조건
1. 먼저 필요한 패키지를 설치하세요.
```python
%%capture
# @title required python packages:
!pip install cryptography
!pip install presidio_analyzer
!pip install presidio_anonymizer
!python -m spacy download en_core_web_lg # Presidio uses spacy NLP engine
!pip install Faker # we'll use Faker to replace PII data with fake data
!pip install weave # To leverage Traces
!pip install set-env-colab-kaggle-dotenv -q # for env var
!pip install anthropic # to use sonnet
!pip install cryptography # to encrypt our data
```
2. API 키를 설정하세요. 다음 링크에서 API 키를 찾을 수 있습니다.
* [W\&B](https://wandb.ai/authorize)
* [Anthropic](https://console.anthropic.com/settings/keys).
```python
%%capture
# @title Make sure to set up set up your API keys correctly
# See: https://pypi.org/project/set-env-colab-kaggle-dotenv/ for usage instructions.
from set_env import set_env
_ = set_env("ANTHROPIC_API_KEY")
_ = set_env("WANDB_API_KEY")
```
3. Weave 프로젝트를 초기화하세요.
```python
import weave
# Start a new Weave project
WEAVE_PROJECT = "pii_cookbook"
weave.init(WEAVE_PROJECT)
```
4. 10개의 텍스트 블록이 포함된 데모 PII 데이터셋을 로드하세요.
```python
import requests
url = "https://raw.githubusercontent.com/wandb/weave/master/docs/notebooks/10_pii_data.json"
response = requests.get(url)
pii_data = response.json()
print('PII data first sample: "' + pii_data[0]["text"] + '"')
```
## 수정 방법 개요
다음을 완료한 후 [설정](#setup), 다음을 수행할 수 있습니다
PII 데이터를 감지하고 보호하기 위해 다음 방법을 사용하여 PII 데이터를 식별하고 수정하며 선택적으로 익명화합니다:
1. **정규 표현식**을 사용하여 PII 데이터를 식별하고 수정합니다.
2. **Microsoft [Presidio](https://microsoft.github.io/presidio/)**, 수정 및 대체 기능을 제공하는 Python 기반 데이터 보호 SDK.
3. **[Faker](https://faker.readthedocs.io/en/master/)**, 가짜 데이터를 생성하기 위한 Python 라이브러리.
### 방법 1: 정규 표현식을 사용한 필터링
[정규 표현식(regex)](https://docs.python.org/3/library/re.html)은 PII 데이터를 식별하고 수정하는 가장 간단한 방법입니다. 정규 표현식을 사용하면 전화번호, 이메일 주소, 사회 보장 번호와 같은 다양한 형식의 민감한 정보와 일치하는 패턴을 정의할 수 있습니다. 정규 표현식을 사용하면 더 복잡한 NLP 기술 없이도 대량의 텍스트를 스캔하고 정보를 대체하거나 수정할 수 있습니다.
```python
import re
# Define a function to clean PII data using regex
def redact_with_regex(text):
# Phone number pattern
# \b : Word boundary
# \d{3} : Exactly 3 digits
# [-.]? : Optional hyphen or dot
# \d{3} : Another 3 digits
# [-.]? : Optional hyphen or dot
# \d{4} : Exactly 4 digits
# \b : Word boundary
text = re.sub(r"\b\d{3}[-.]?\d{3}[-.]?\d{4}\b", "", text)
# Email pattern
# \b : Word boundary
# [A-Za-z0-9._%+-]+ : One or more characters that can be in an email username
# @ : Literal @ symbol
# [A-Za-z0-9.-]+ : One or more characters that can be in a domain name
# \. : Literal dot
# [A-Z|a-z]{2,} : Two or more uppercase or lowercase letters (TLD)
# \b : Word boundary
text = re.sub(
r"\b[A-Za-z0-9._%+-]+@[A-Za-z0-9.-]+\.[A-Z|a-z]{2,}\b", "", text
)
# SSN pattern
# \b : Word boundary
# \d{3} : Exactly 3 digits
# - : Literal hyphen
# \d{2} : Exactly 2 digits
# - : Literal hyphen
# \d{4} : Exactly 4 digits
# \b : Word boundary
text = re.sub(r"\b\d{3}-\d{2}-\d{4}\b", "", text)
# Simple name pattern (this is not comprehensive)
# \b : Word boundary
# [A-Z] : One uppercase letter
# [a-z]+ : One or more lowercase letters
# \s : One whitespace character
# [A-Z] : One uppercase letter
# [a-z]+ : One or more lowercase letters
# \b : Word boundary
text = re.sub(r"\b[A-Z][a-z]+ [A-Z][a-z]+\b", "", text)
return text
```
샘플 텍스트로 함수를 테스트해 보겠습니다:
```python
# Test the function
test_text = "My name is John Doe, my email is john.doe@example.com, my phone is 123-456-7890, and my SSN is 123-45-6789."
cleaned_text = redact_with_regex(test_text)
print(f"Raw text:\n\t{test_text}")
print(f"Redacted text:\n\t{cleaned_text}")
```
### 방법 2: Microsoft Presidio를 사용한 수정
다음 방법은 다음을 사용하여 PII 데이터를 완전히 제거하는 것입니다 [Microsoft Presidio](https://microsoft.github.io/presidio/). Presidio는 PII를 수정하고 PII 유형을 나타내는 자리 표시자로 대체합니다. 예를 들어, Presidio는 `Alex` 내의 `"My name is Alex"`을 ``로 대체합니다.
Presidio는 [일반적인 엔티티](https://microsoft.github.io/presidio/supported_entities/)에 대한 내장 지원을 제공합니다. 아래 예제에서는 `PHONE_NUMBER`, `PERSON`, `LOCATION`, `EMAIL_ADDRESS` 또는 `US_SSN`인 모든 엔티티를 수정합니다. Presidio 프로세스는 함수로 캡슐화됩니다.
```python
from presidio_analyzer import AnalyzerEngine
from presidio_anonymizer import AnonymizerEngine
# Set up the Analyzer, which loads an NLP module (spaCy model by default) and other PII recognizers.
analyzer = AnalyzerEngine()
# Set up the Anonymizer, which will use the analyzer results to anonymize the text.
anonymizer = AnonymizerEngine()
# Encapsulate the Presidio redaction process into a function
def redact_with_presidio(text):
# Analyze the text to identify PII data
results = analyzer.analyze(
text=text,
entities=["PHONE_NUMBER", "PERSON", "LOCATION", "EMAIL_ADDRESS", "US_SSN"],
language="en",
)
# Anonymize the identified PII data
anonymized_text = anonymizer.anonymize(text=text, analyzer_results=results)
return anonymized_text.text
```
샘플 텍스트로 함수를 테스트해 보겠습니다:
```python
text = "My phone number is 212-555-5555 and my name is alex"
# Test the function
anonymized_text = redact_with_presidio(text)
print(f"Raw text:\n\t{text}")
print(f"Redacted text:\n\t{anonymized_text}")
```
### 방법 3: Faker와 Presidio를 사용한 대체를 통한 익명화
텍스트를 수정하는 대신, MS Presidio를 사용하여 이름 및 전화번호와 같은 PII를 [Faker](https://faker.readthedocs.io/en/master/) Python 라이브러리를 사용하여 생성된 가짜 데이터로 교체하여 익명화할 수 있습니다. 예를 들어, 다음과 같은 데이터가 있다고 가정해 보세요:
`"My name is Raphael and I like to fish. My phone number is 212-555-5555"`
Presidio와 Faker를 사용하여 데이터가 처리되면 다음과 같이 보일 수 있습니다:
`"My name is Katherine Dixon and I like to fish. My phone number is 667.431.7379"`
Presidio와 Faker를 효과적으로 함께 사용하려면 사용자 정의 연산자에 대한 참조를 제공해야 합니다. 이러한 연산자는 Presidio를 PII를 가짜 데이터로 교체하는 Faker 함수로 안내합니다.
```python
from faker import Faker
from presidio_anonymizer import AnonymizerEngine
from presidio_anonymizer.entities import OperatorConfig
fake = Faker()
# Create faker functions (note that it has to receive a value)
def fake_name(x):
return fake.name()
def fake_number(x):
return fake.phone_number()
# Create custom operator for the PERSON and PHONE_NUMBER" entities
operators = {
"PERSON": OperatorConfig("custom", {"lambda": fake_name}),
"PHONE_NUMBER": OperatorConfig("custom", {"lambda": fake_number}),
}
text_to_anonymize = (
"My name is Raphael and I like to fish. My phone number is 212-555-5555"
)
# Analyzer output
analyzer_results = analyzer.analyze(
text=text_to_anonymize, entities=["PHONE_NUMBER", "PERSON"], language="en"
)
anonymizer = AnonymizerEngine()
# do not forget to pass the operators from above to the anonymizer
anonymized_results = anonymizer.anonymize(
text=text_to_anonymize, analyzer_results=analyzer_results, operators=operators
)
print(f"Raw text:\n\t{text_to_anonymize}")
print(f"Anonymized text:\n\t{anonymized_results.text}")
```
코드를 단일 클래스로 통합하고 이전에 식별된 추가 엔티티를 포함하도록 엔티티 목록을 확장해 보겠습니다.
```python
from typing import ClassVar
from faker import Faker
from presidio_anonymizer import AnonymizerEngine
from presidio_anonymizer.entities import OperatorConfig
# A custom class for generating fake data that extends Faker
class MyFaker(Faker):
# Create faker functions (note that it has to receive a value)
def fake_address(self):
return fake.address()
def fake_ssn(self):
return fake.ssn()
def fake_name(self):
return fake.name()
def fake_number(self):
return fake.phone_number()
def fake_email(self):
return fake.email()
# Create custom operators for the entities
operators: ClassVar[dict[str, OperatorConfig]] = {
"PERSON": OperatorConfig("custom", {"lambda": fake_name}),
"PHONE_NUMBER": OperatorConfig("custom", {"lambda": fake_number}),
"EMAIL_ADDRESS": OperatorConfig("custom", {"lambda": fake_email}),
"LOCATION": OperatorConfig("custom", {"lambda": fake_address}),
"US_SSN": OperatorConfig("custom", {"lambda": fake_ssn}),
}
def redact_and_anonymize_with_faker(self, text):
anonymizer = AnonymizerEngine()
analyzer_results = analyzer.analyze(
text=text,
entities=["PHONE_NUMBER", "PERSON", "LOCATION", "EMAIL_ADDRESS", "US_SSN"],
language="en",
)
anonymized_results = anonymizer.anonymize(
text=text, analyzer_results=analyzer_results, operators=self.operators
)
return anonymized_results.text
```
샘플 텍스트로 함수를 테스트해 보겠습니다:
```python
faker = MyFaker()
text_to_anonymize = (
"My name is Raphael and I like to fish. My phone number is 212-555-5555"
)
anonymized_text = faker.redact_and_anonymize_with_faker(text_to_anonymize)
print(f"Raw text:\n\t{text_to_anonymize}")
print(f"Anonymized text:\n\t{anonymized_text}")
```
### 방법 4: 다음 사용 `autopatch_settings`
다음을 사용할 수 있습니다 `autopatch_settings` 지원되는 LLM 통합 중 하나 이상에 대해 초기화 중에 직접 PII 처리를 구성합니다. 이 방법의 장점은 다음과 같습니다:
1. PII 처리 로직이 초기화 시 중앙 집중화되고 범위가 지정되어 분산된 사용자 정의 로직의 필요성이 줄어듭니다.
2. PII 처리 워크플로우는 특정 통합에 대해 사용자 정의하거나 완전히 비활성화할 수 있습니다.
다음을 사용하려면 `autopatch_settings` PII 처리를 구성하려면, 다음을 정의하세요 `postprocess_inputs` 및/또는 `postprocess_output` 내의 `op_settings` 지원되는 LLM 통합 중 하나에 대해.
```python
def postprocess(inputs: dict) -> dict:
if "SENSITIVE_KEY" in inputs:
inputs["SENSITIVE_KEY"] = "REDACTED"
return inputs
client = weave.init(
...,
autopatch_settings={
"openai": {
"op_settings": {
"postprocess_inputs": postprocess,
"postprocess_output": ...,
}
},
"anthropic": {
"op_settings": {
"postprocess_inputs": ...,
"postprocess_output": ...,
}
}
},
)
```
## Weave 호출에 방법 적용
다음 예제에서는 PII 수정 및 익명화 방법을 Weave Models에 통합하고 Weave Traces에서 결과를 미리 봅니다.
먼저, 다음을 생성합니다 [Weave Model](https://wandb.github.io/weave/guides/core-types/models). Weave Model은 모델이 작동하는 방식을 정의하는 구성 설정, 모델 가중치 및 코드와 같은 정보의 조합입니다.
우리 모델에서는 Anthropic API가 호출될 predict 함수를 포함할 것입니다. Anthropic의 Claude Sonnet은 Traces를 사용하여 LLM 호출을 추적하면서 감정 분석을 수행하는 데 사용됩니다[Traces](https://wandb.github.io/weave/quickstart). Claude Sonnet은 텍스트 블록을 받아 다음 감정 분류 중 하나를 출력합니다:*positive*, *negative*, 또는 *neutral*. 또한 PII 데이터가 LLM에 전송되기 전에 수정되거나 익명화되도록 후처리 함수도 포함할 것입니다.
이 코드를 실행하면 Weave 프로젝트 페이지와 실행한 특정 trace(LLM 호출)에 대한 링크를 받게 됩니다.
### 정규식 방법
가장 간단한 경우, 정규식을 사용하여 원본 텍스트에서 PII 데이터를 식별하고 수정할 수 있습니다.
```python
import json
from typing import Any
import anthropic
import weave
# Define an input postprocessing function that applies our regex redaction for the model prediction Weave Op
def postprocess_inputs_regex(inputs: dict[str, Any]) -> dict:
inputs["text_block"] = redact_with_regex(inputs["text_block"])
return inputs
# Weave model / predict function
class SentimentAnalysisRegexPiiModel(weave.Model):
model_name: str
system_prompt: str
temperature: int
@weave.op(
postprocess_inputs=postprocess_inputs_regex,
)
async def predict(self, text_block: str) -> dict:
client = anthropic.AsyncAnthropic()
response = await client.messages.create(
max_tokens=1024,
model=self.model_name,
system=self.system_prompt,
messages=[
{"role": "user", "content": [{"type": "text", "text": text_block}]}
],
)
result = response.content[0].text
if result is None:
raise ValueError("No response from model")
parsed = json.loads(result)
return parsed
python
# create our LLM model with a system prompt
model = SentimentAnalysisRegexPiiModel(
name="claude-3-sonnet",
model_name="claude-3-5-sonnet-20240620",
system_prompt='You are a Sentiment Analysis classifier. You will be classifying text based on their sentiment. Your input will be a block of text. You will answer with one the following rating option["positive", "negative", "neutral"]. Your answer should be one word in json format: {classification}. Ensure that it is valid JSON.',
temperature=0,
)
print("Model: ", model)
# for every block of text, anonymized first and then predict
for entry in pii_data:
await model.predict(entry["text"])
```
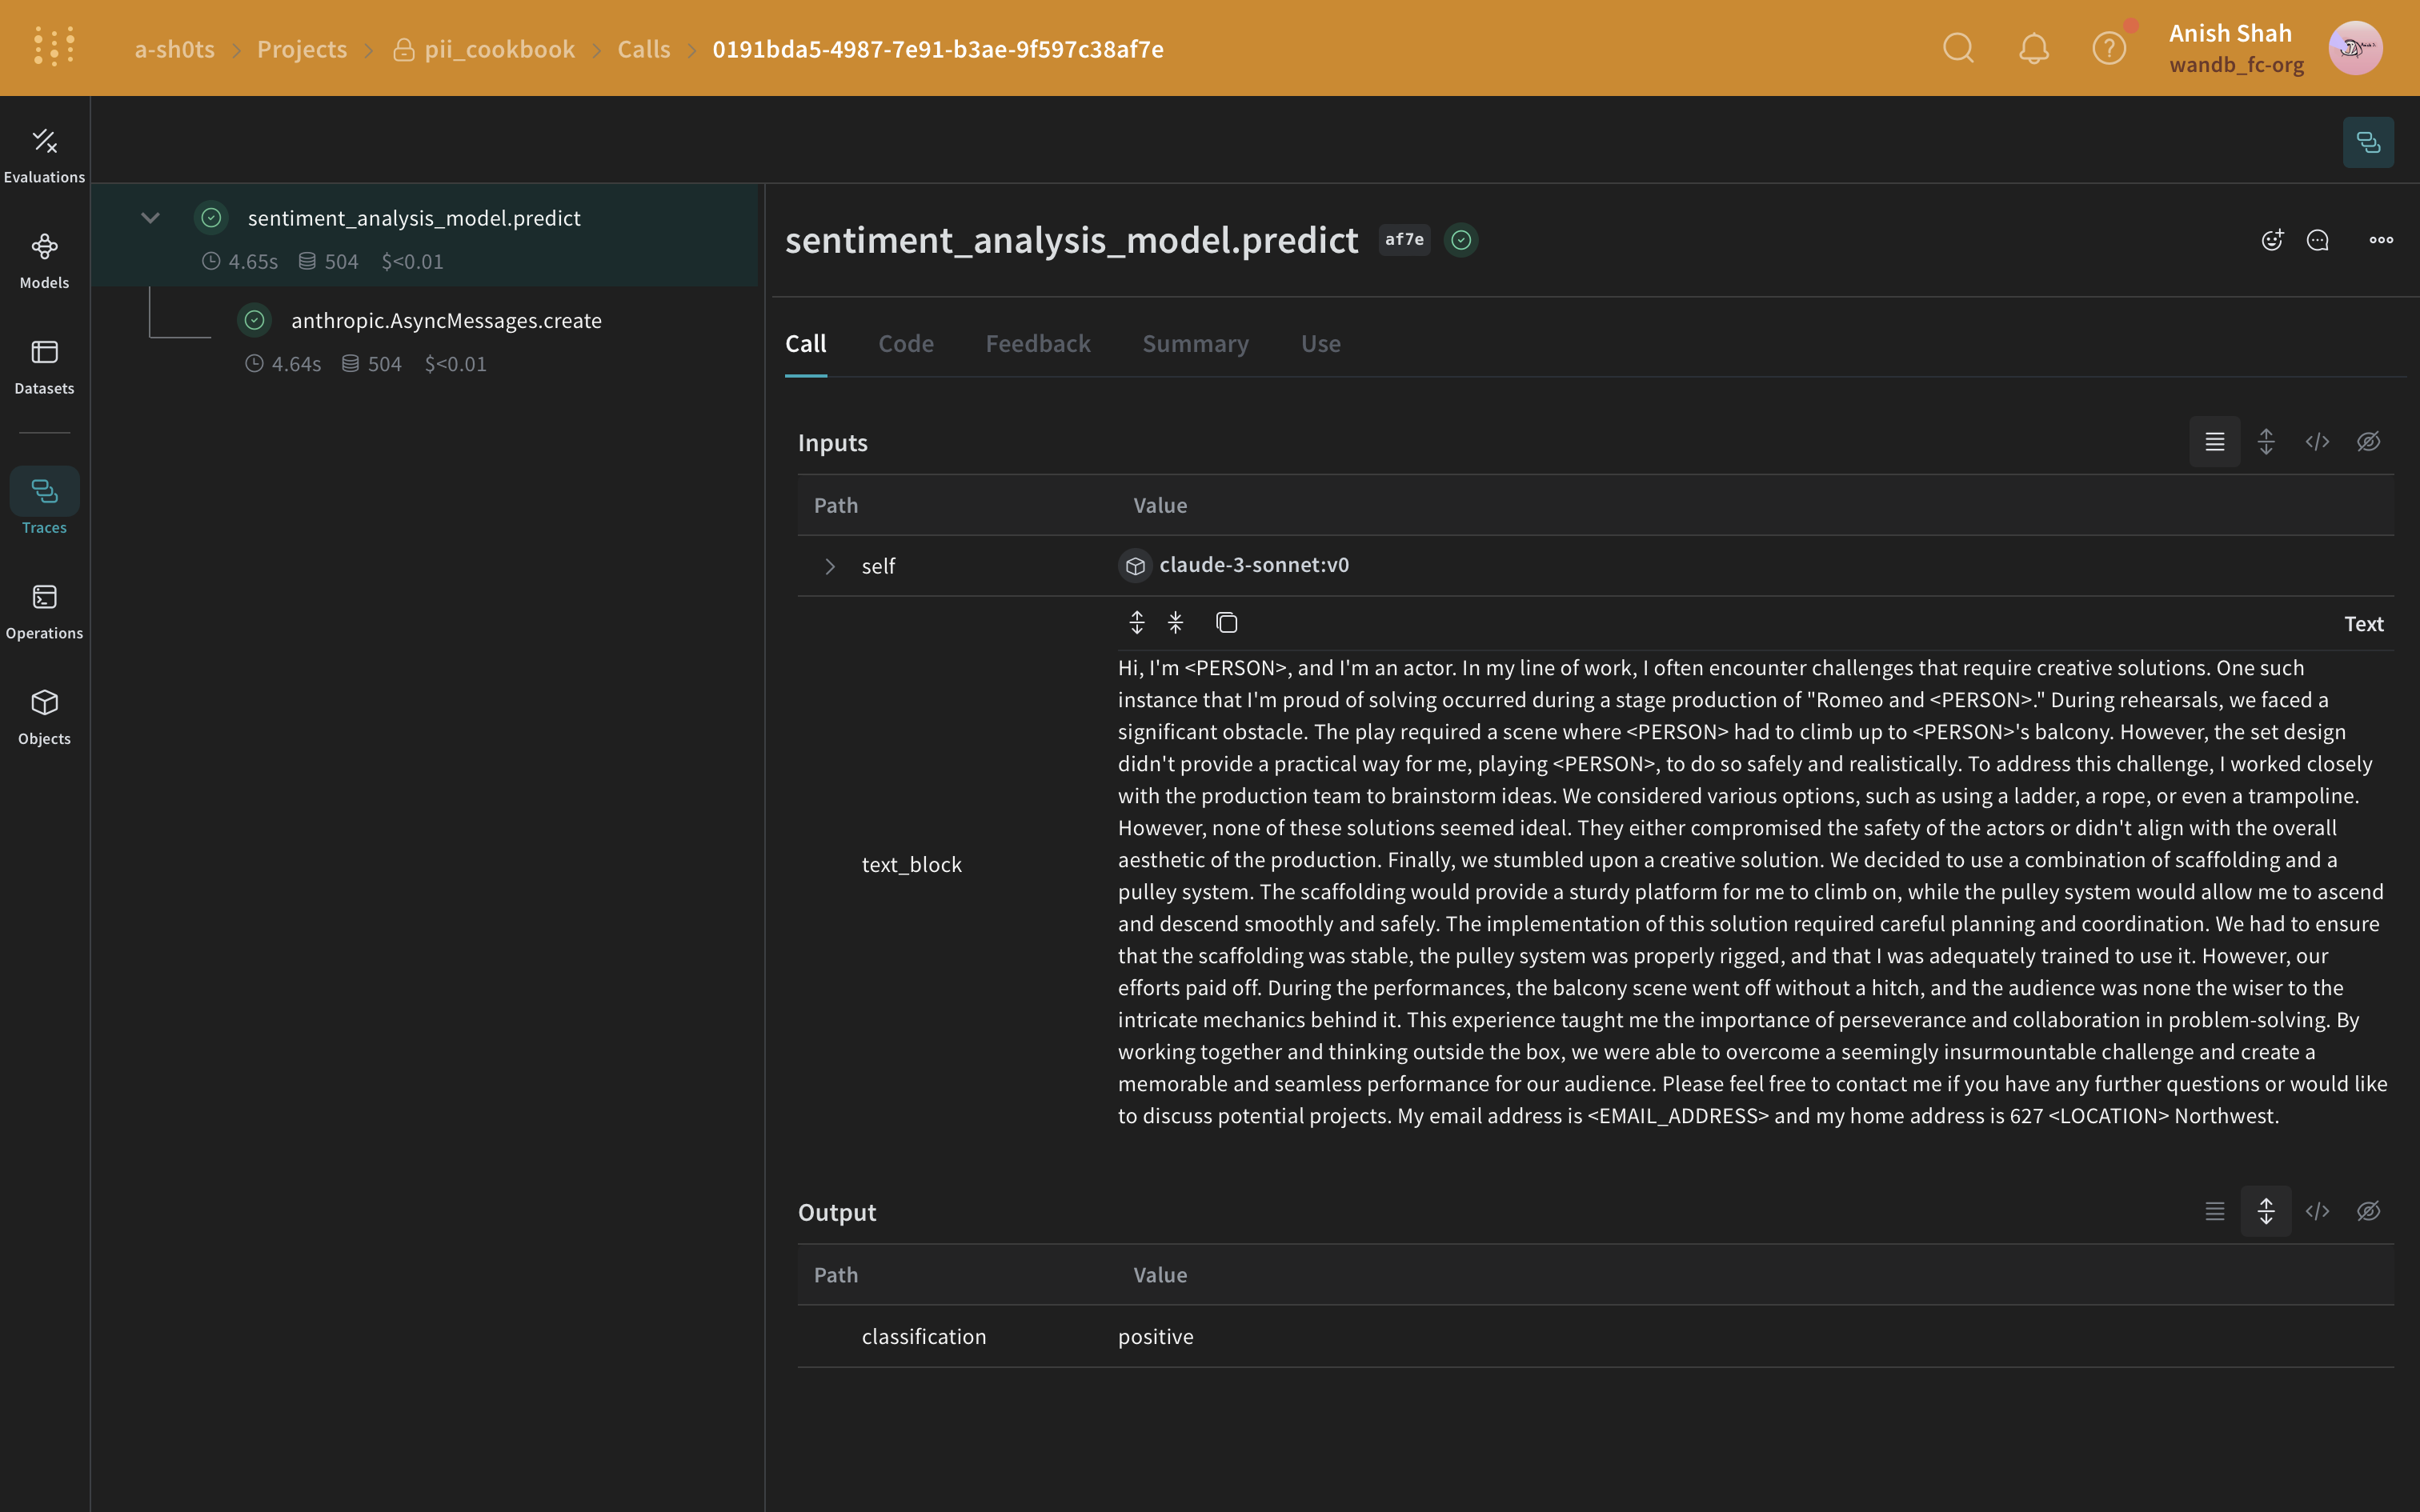
### Presidio 수정 방법
다음으로, Presidio를 사용하여 원본 텍스트에서 PII 데이터를 식별하고 수정할 것입니다.
```python
from typing import Any
import weave
# Define an input postprocessing function that applies our Presidio redaction for the model prediction Weave Op
def postprocess_inputs_presidio(inputs: dict[str, Any]) -> dict:
inputs["text_block"] = redact_with_presidio(inputs["text_block"])
return inputs
# Weave model / predict function
class SentimentAnalysisPresidioPiiModel(weave.Model):
model_name: str
system_prompt: str
temperature: int
@weave.op(
postprocess_inputs=postprocess_inputs_presidio,
)
async def predict(self, text_block: str) -> dict:
client = anthropic.AsyncAnthropic()
response = await client.messages.create(
max_tokens=1024,
model=self.model_name,
system=self.system_prompt,
messages=[
{"role": "user", "content": [{"type": "text", "text": text_block}]}
],
)
result = response.content[0].text
if result is None:
raise ValueError("No response from model")
parsed = json.loads(result)
return parsed
python
# create our LLM model with a system prompt
model = SentimentAnalysisPresidioPiiModel(
name="claude-3-sonnet",
model_name="claude-3-5-sonnet-20240620",
system_prompt='You are a Sentiment Analysis classifier. You will be classifying text based on their sentiment. Your input will be a block of text. You will answer with one the following rating option["positive", "negative", "neutral"]. Your answer should be one word in json format: {classification}. Ensure that it is valid JSON.',
temperature=0,
)
print("Model: ", model)
# for every block of text, anonymized first and then predict
for entry in pii_data:
await model.predict(entry["text"])
```
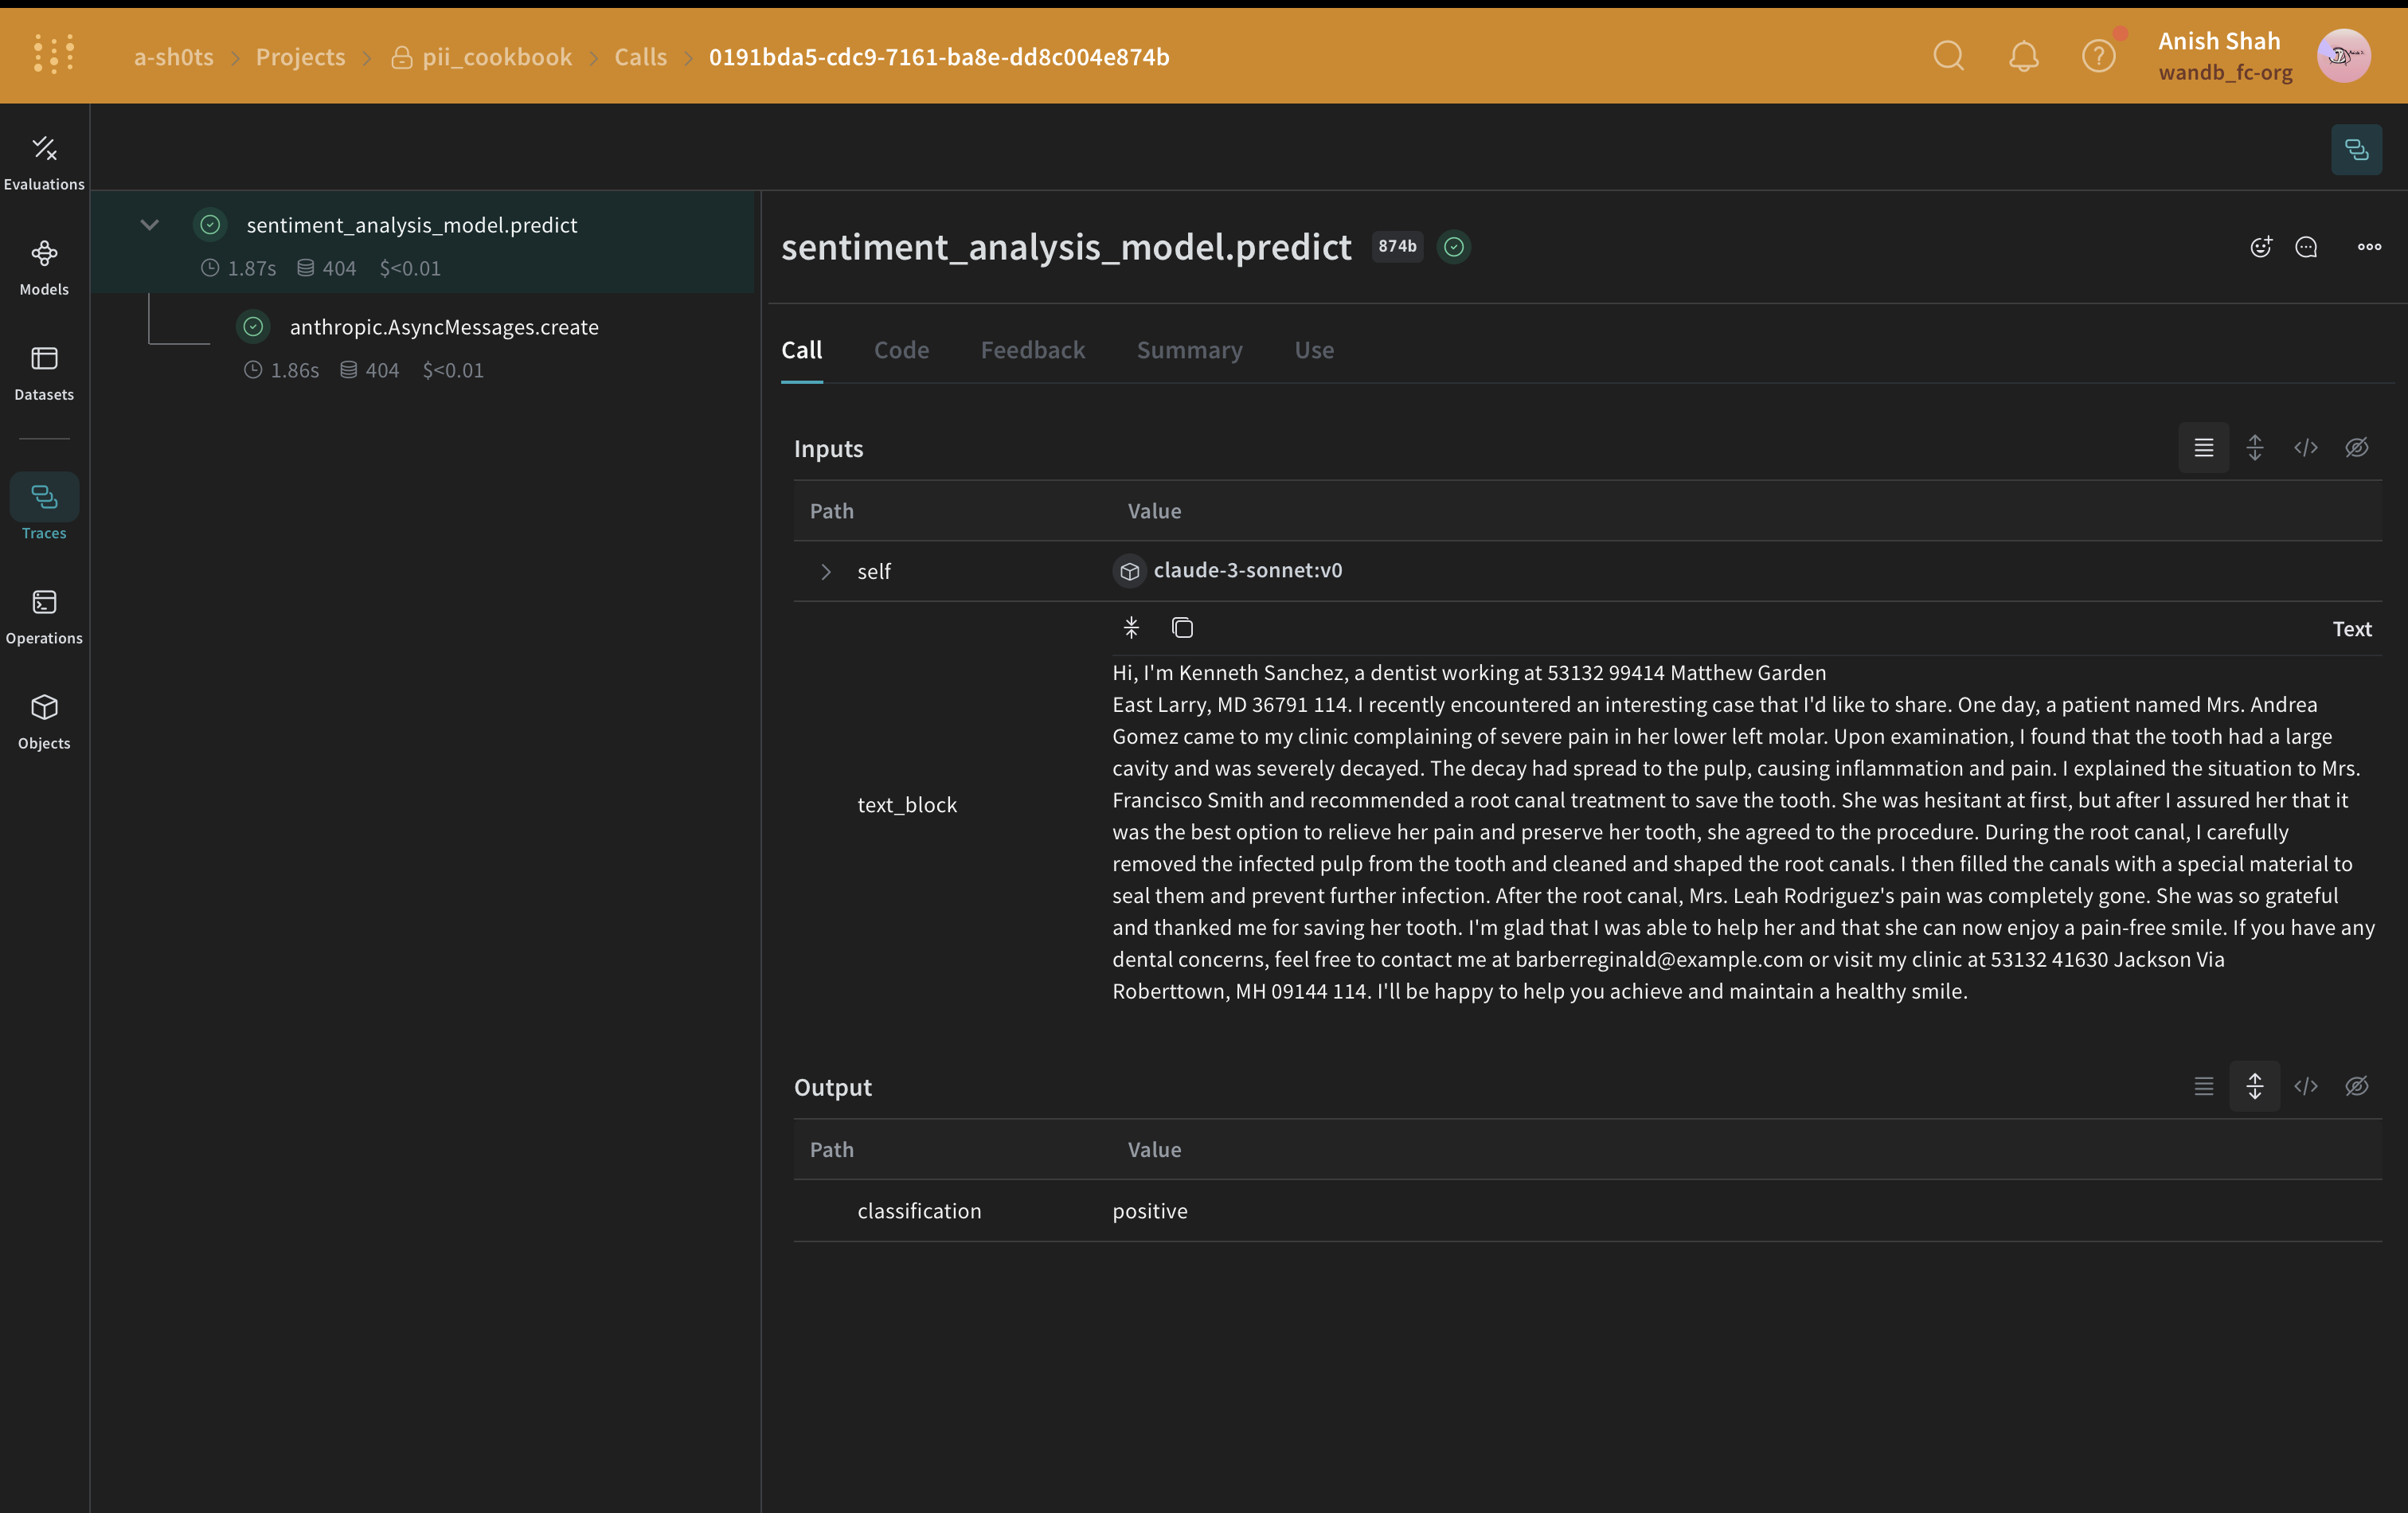
### Faker 및 Presidio 대체 방법
이 예제에서는 Faker를 사용하여 익명화된 대체 PII 데이터를 생성하고 Presidio를 사용하여 원본 텍스트에서 PII 데이터를 식별하고 대체합니다.
```python
from typing import Any
import weave
# Define an input postprocessing function that applies our Faker anonymization and Presidio redaction for the model prediction Weave Op
faker = MyFaker()
def postprocess_inputs_faker(inputs: dict[str, Any]) -> dict:
inputs["text_block"] = faker.redact_and_anonymize_with_faker(inputs["text_block"])
return inputs
# Weave model / predict function
class SentimentAnalysisFakerPiiModel(weave.Model):
model_name: str
system_prompt: str
temperature: int
@weave.op(
postprocess_inputs=postprocess_inputs_faker,
)
async def predict(self, text_block: str) -> dict:
client = anthropic.AsyncAnthropic()
response = await client.messages.create(
max_tokens=1024,
model=self.model_name,
system=self.system_prompt,
messages=[
{"role": "user", "content": [{"type": "text", "text": text_block}]}
],
)
result = response.content[0].text
if result is None:
raise ValueError("No response from model")
parsed = json.loads(result)
return parsed
python
# create our LLM model with a system prompt
model = SentimentAnalysisFakerPiiModel(
name="claude-3-sonnet",
model_name="claude-3-5-sonnet-20240620",
system_prompt='You are a Sentiment Analysis classifier. You will be classifying text based on their sentiment. Your input will be a block of text. You will answer with one the following rating option["positive", "negative", "neutral"]. Your answer should be one word in json format: {classification}. Ensure that it is valid JSON.',
temperature=0,
)
print("Model: ", model)
# for every block of text, anonymized first and then predict
for entry in pii_data:
await model.predict(entry["text"])
```
### `autopatch_settings` 방법
다음 예제에서는 `postprocess_inputs` for `anthropic` to the `postprocess_inputs_regex()` function ()를 초기화 시 설정합니다. `postprocess_inputs_regex` function은`redact_with_regex` method를 적용합니다 [방법 1: 정규 표현식 필터링](#method-1-regular-expression-filtering). 이제, `redact_with_regex`은(는) 모든 `anthropic` 모델의 입력에 적용됩니다.
```python
from typing import Any
import weave
client = weave.init(
...,
autopatch_settings={
"anthropic": {
"op_settings": {
"postprocess_inputs": postprocess_inputs_regex,
}
}
},
)
# Define an input postprocessing function that applies our regex redaction for the model prediction Weave Op
def postprocess_inputs_regex(inputs: dict[str, Any]) -> dict:
inputs["text_block"] = redact_with_regex(inputs["text_block"])
return inputs
# Weave model / predict function
class SentimentAnalysisRegexPiiModel(weave.Model):
model_name: str
system_prompt: str
temperature: int
async def predict(self, text_block: str) -> dict:
client = anthropic.AsyncAnthropic()
response = await client.messages.create(
max_tokens=1024,
model=self.model_name,
system=self.system_prompt,
messages=[
{"role": "user", "content": [{"type": "text", "text": text_block}]}
],
)
result = response.content[0].text
if result is None:
raise ValueError("No response from model")
parsed = json.loads(result)
return parsed
python
# create our LLM model with a system prompt
model = SentimentAnalysisRegexPiiModel(
name="claude-3-sonnet",
model_name="claude-3-5-sonnet-20240620",
system_prompt='You are a Sentiment Analysis classifier. You will be classifying text based on their sentiment. Your input will be a block of text. You will answer with one the following rating option["positive", "negative", "neutral"]. Your answer should be one word in json format: {classification}. Ensure that it is valid JSON.',
temperature=0,
)
print("Model: ", model)
# for every block of text, anonymized first and then predict
for entry in pii_data:
await model.predict(entry["text"])
```
### (선택 사항) 데이터 암호화
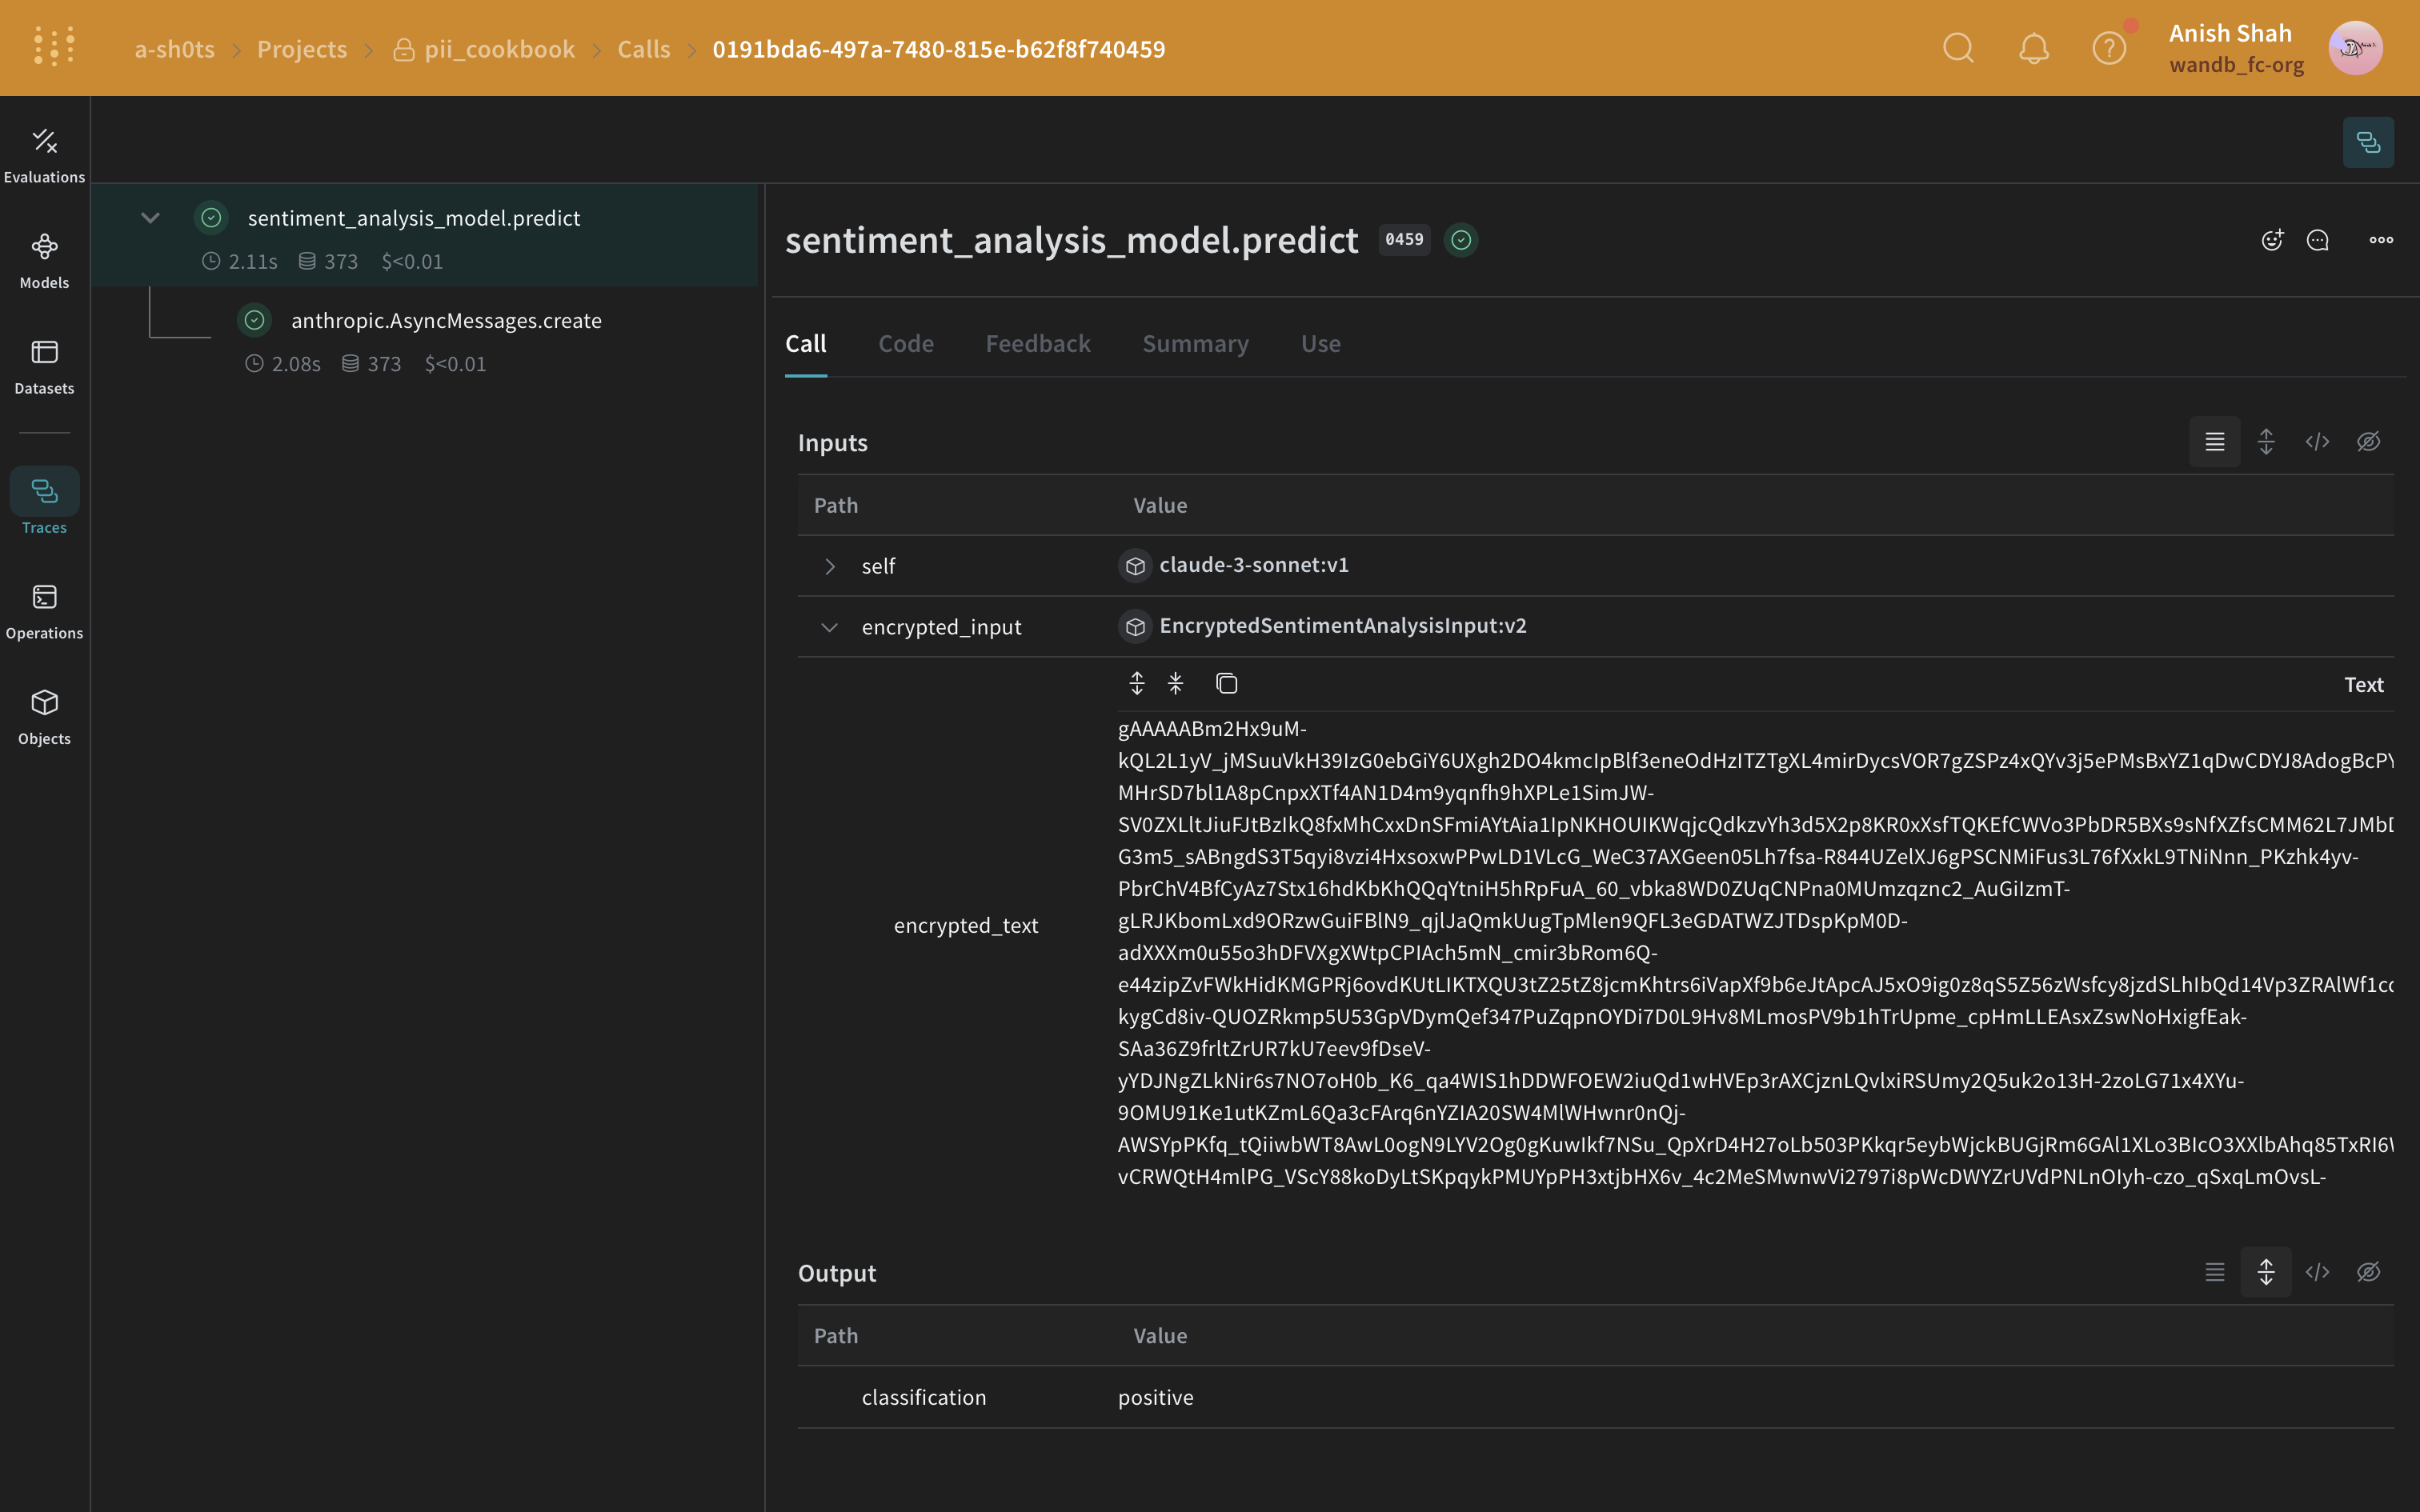
PII 익명화 외에도 cryptography 라이브러리의 [Fernet](https://cryptography.io/en/latest/fernet/) 대칭 암호화를 사용하여 데이터에 추가 보안 계층을 추가할 수 있습니다. 이 접근 방식은 익명화된 데이터가 가로채어도 암호화 키 없이는 읽을 수 없도록 보장합니다.
```python
import os
from cryptography.fernet import Fernet
from pydantic import BaseModel, ValidationInfo, model_validator
def get_fernet_key():
# Check if the key exists in environment variables
key = os.environ.get('FERNET_KEY')
if key is None:
# If the key doesn't exist, generate a new one
key = Fernet.generate_key()
# Save the key to an environment variable
os.environ['FERNET_KEY'] = key.decode()
else:
# If the key exists, ensure it's in bytes
key = key.encode()
return key
cipher_suite = Fernet(get_fernet_key())
class EncryptedSentimentAnalysisInput(BaseModel):
encrypted_text: str = None
@model_validator(mode="before")
def encrypt_fields(cls, values):
if "text" in values and values["text"] is not None:
values["encrypted_text"] = cipher_suite.encrypt(values["text"].encode()).decode()
del values["text"]
return values
@property
def text(self):
if self.encrypted_text:
return cipher_suite.decrypt(self.encrypted_text.encode()).decode()
return None
@text.setter
def text(self, value):
self.encrypted_text = cipher_suite.encrypt(str(value).encode()).decode()
@classmethod
def encrypt(cls, text: str):
return cls(text=text)
def decrypt(self):
return self.text
# Modified sentiment_analysis_model to use the new EncryptedSentimentAnalysisInput
class sentiment_analysis_model(weave.Model):
model_name: str
system_prompt: str
temperature: int
@weave.op()
async def predict(self, encrypted_input: EncryptedSentimentAnalysisInput) -> dict:
client = AsyncAnthropic()
decrypted_text = encrypted_input.decrypt() # We use the custom class to decrypt the text
response = await client.messages.create(
max_tokens=1024,
model=self.model_name,
system=self.system_prompt,
messages=[
{ "role": "user",
"content":[
{
"type": "text",
"text": decrypted_text
}
]
}
]
)
result = response.content[0].text
if result is None:
raise ValueError("No response from model")
parsed = json.loads(result)
return parsed
model = sentiment_analysis_model(
name="claude-3-sonnet",
model_name="claude-3-5-sonnet-20240620",
system_prompt="You are a Sentiment Analysis classifier. You will be classifying text based on their sentiment. Your input will be a block of text. You will answer with one the following rating option[\"positive\", \"negative\", \"neutral\"]. Your answer should one word in json format dict where the key is classification.",
temperature=0
)
for entry in pii_data:
encrypted_input = EncryptedSentimentAnalysisInput.encrypt(entry["text"])
await model.predict(encrypted_input)
```