Calls
Calls는 Weave의 기본 구성 요소입니다. 다음을 포함하는 함수의 단일 실행을 나타냅니다:
- 입력(인수)
- 출력(반환 값)
- 메타데이터(지속 시간, 예외, LLM 사용량 등)
- Trace에 속함(동일한 실행 컨텍스트에 있는 calls 모음)
- 부모 및 자식 Calls를 가질 수 있으며, 트리 구조를 형성함
Calls 생성하기
Weave에서 Calls를 생성하는 세 가지 주요 방법이 있습니다:1. LLM 라이브러리의 자동 추적
- Python
- TypeScript
Weave는 자동으로 일반적인 LLM 라이브러리 호출을 추적합니다 예를 들면
openai, anthropic, cohere, 그리고 mistral. 프로그램 시작 시 간단히 weave.init('project_name')를 호출하세요:showLineNumbers
요약
Call의summary
사전에 메트릭이나 다른 호출 후 값을 저장할 수 있습니다. call.summary를 실행 중에 수정하면 추가한 모든
값이 호출이 완료될 때 Weave의 계산된 요약 데이터와 병합됩니다.
2. 함수 데코레이팅 및 래핑
그러나 종종 LLM 애플리케이션에는 추적하고 싶은 추가 로직(예: 전/후 처리, 프롬프트 등)이 있습니다.- Python
- TypeScript

실행 중 call 객체에 대한 핸들 얻기
- Python
- TypeScript
때로는 그런 다음,
Call 객체 자체에 대한 핸들을 얻는 것이 유용합니다. op.call 메서드를 호출하여 결과와 Call 객체를 모두 반환받을 수 있습니다. 예를 들면:showLineNumbers
call를 사용하여 추가 속성을 설정/업데이트/가져올 수 있습니다(주로 피드백에 사용할 호출 ID를 가져오는 데 사용됨).op가 클래스의 메서드인 경우, 인스턴스를 op의 첫 번째 인수로 전달해야 합니다(아래 예제 참조).
showLineNumbers
showLineNumbers
Call 표시 이름
- Python
- TypeScript
때로는 호출의 표시 이름을 재정의하고 싶을 수 있습니다. 다음 네 가지 방법 중 하나로 이를 달성할 수 있습니다:
- op를 호출할 때 표시 이름 변경:
showLineNumbers
사용
__weave 사전은 호출 표시 이름을 설정하며, 이는 Op 표시 이름보다 우선합니다.- 호출별로 표시 이름 변경. 이는
Op.call메서드를 사용하여Call객체를 반환한 다음,Call.set_display_name를 사용하여 표시 이름을 설정합니다.
showLineNumbers
- 주어진 Op의 모든 Calls에 대한 표시 이름 변경:
showLineNumbers
-
이
call_display_name는Call객체를 받아 문자열을 반환하는 함수일 수도 있습니다.Call객체는 함수가 호출될 때 자동으로 전달되므로, 함수 이름, 호출 입력, 필드 등을 기반으로 이름을 동적으로 생성하는 데 사용할 수 있습니다. -
일반적인 사용 사례 중 하나는 함수 이름에 타임스탬프를 추가하는 것입니다.
-
다음을 사용하여 사용자 정의 메타데이터를 기록할 수도 있습니다
.attributes
@weave.op로 데코레이트된 함수나 메서드입니다.
기본적으로 Op의 이름은 함수 이름이며, 관련 호출은 동일한 표시 이름을 갖습니다. 위의 예는 주어진 Op의 모든 Calls에 대한 표시 이름을 재정의하는 방법을 보여줍니다. 때로는 사용자가 Op 자체의 이름을 재정의하고 싶을 수 있습니다. 이는 다음 두 가지 방법 중 하나로 달성할 수 있습니다:- 호출이 기록되기 전에 Op의
name속성 설정
showLineNumbers
- op 데코레이터에
name옵션 설정
showLineNumbers
속성
- Python
- TypeScript
추적된 함수를 호출할 때
weave.attributes 컨텍스트 관리자를 사용하여 호출에 추가 메타데이터를 추가할 수 있습니다. 아래 예에서는 env로 지정된 호출에 'production' 속성을 추가합니다.showLineNumbers
병렬(멀티스레드) 함수 호출 추적
- Python
기본적으로 병렬 호출은 모두 Weave에서 별도의 루트 호출로 표시됩니다. 동일한 부모 Weave UI에서는 이것이 다섯 개의 중첩된 자식 호출이 있는 단일 부모 호출을 생성하므로, 증분이 병렬로 실행되더라도 완전히 계층적인 추적을 얻을 수 있습니다.
op 아래에 올바른 중첩을 얻으려면 ThreadPoolExecutor를 사용하세요.다음 코드 샘플은 ThreadPoolExecutor의 사용을 보여줍니다.
첫 번째 함수인 func는 간단한 op로 x를 받아 x+1를 반환합니다. 두 번째 함수인 outer는 또 다른 op로 입력 목록을 받습니다.
outer 내부에서 ThreadPoolExecutor와 exc.map(func, inputs)의 사용은 func에 대한 각 호출이 여전히 동일한 부모 추적 컨텍스트를 가지고 있음을 의미합니다.3. 수동 Call 추적
API를 직접 사용하여 수동으로 Calls를 생성할 수도 있습니다.- Python
- TypeScript
- HTTP API
showLineNumbers
4. 클래스 및 객체 메서드 추적
클래스 및 객체 메서드도 추적할 수 있습니다.- Python
- TypeScript
클래스의 모든 메서드를 추적하려면
weave.op.showLineNumbers
통화 보기
- 웹 앱
- Python
- TypeScript
- HTTP API
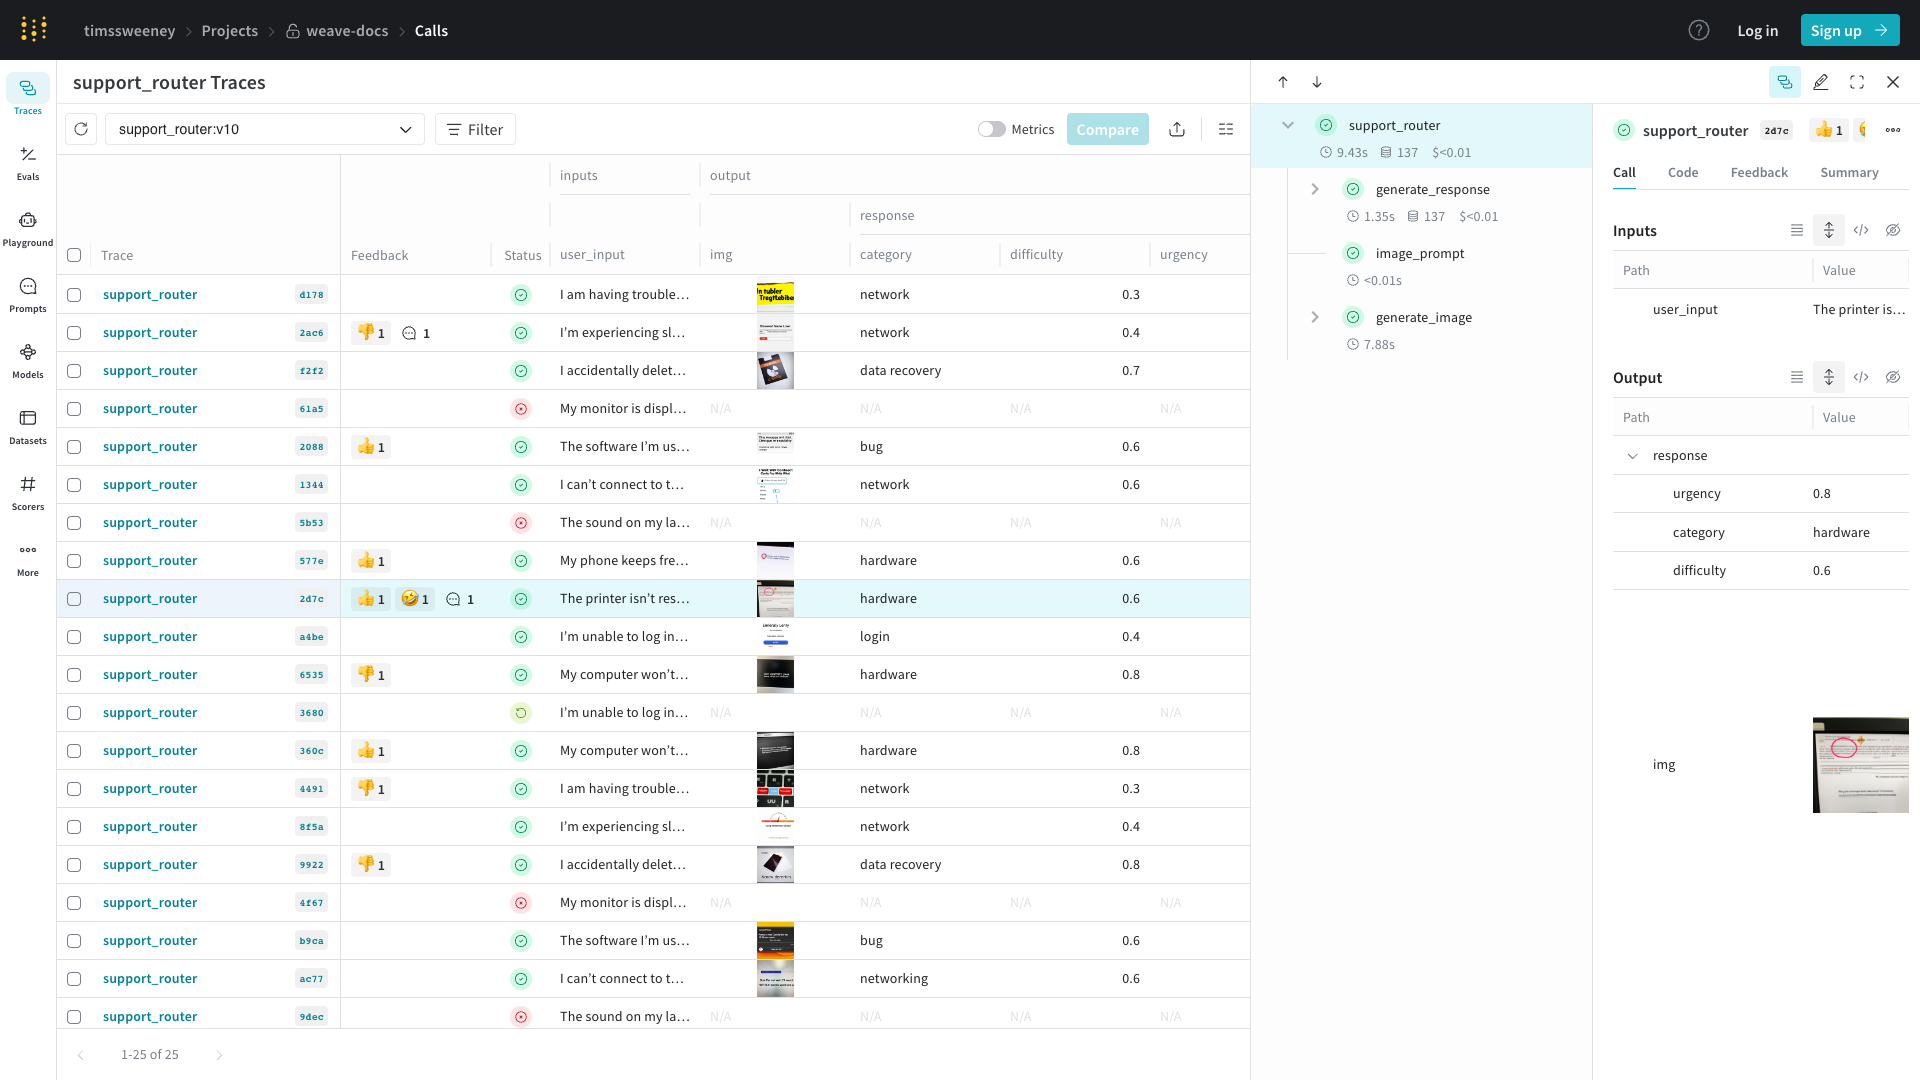
웹 앱에서 통화를 보려면:
- 프로젝트의 “Traces” 탭으로 이동
- 목록에서 보고 싶은 통화 찾기
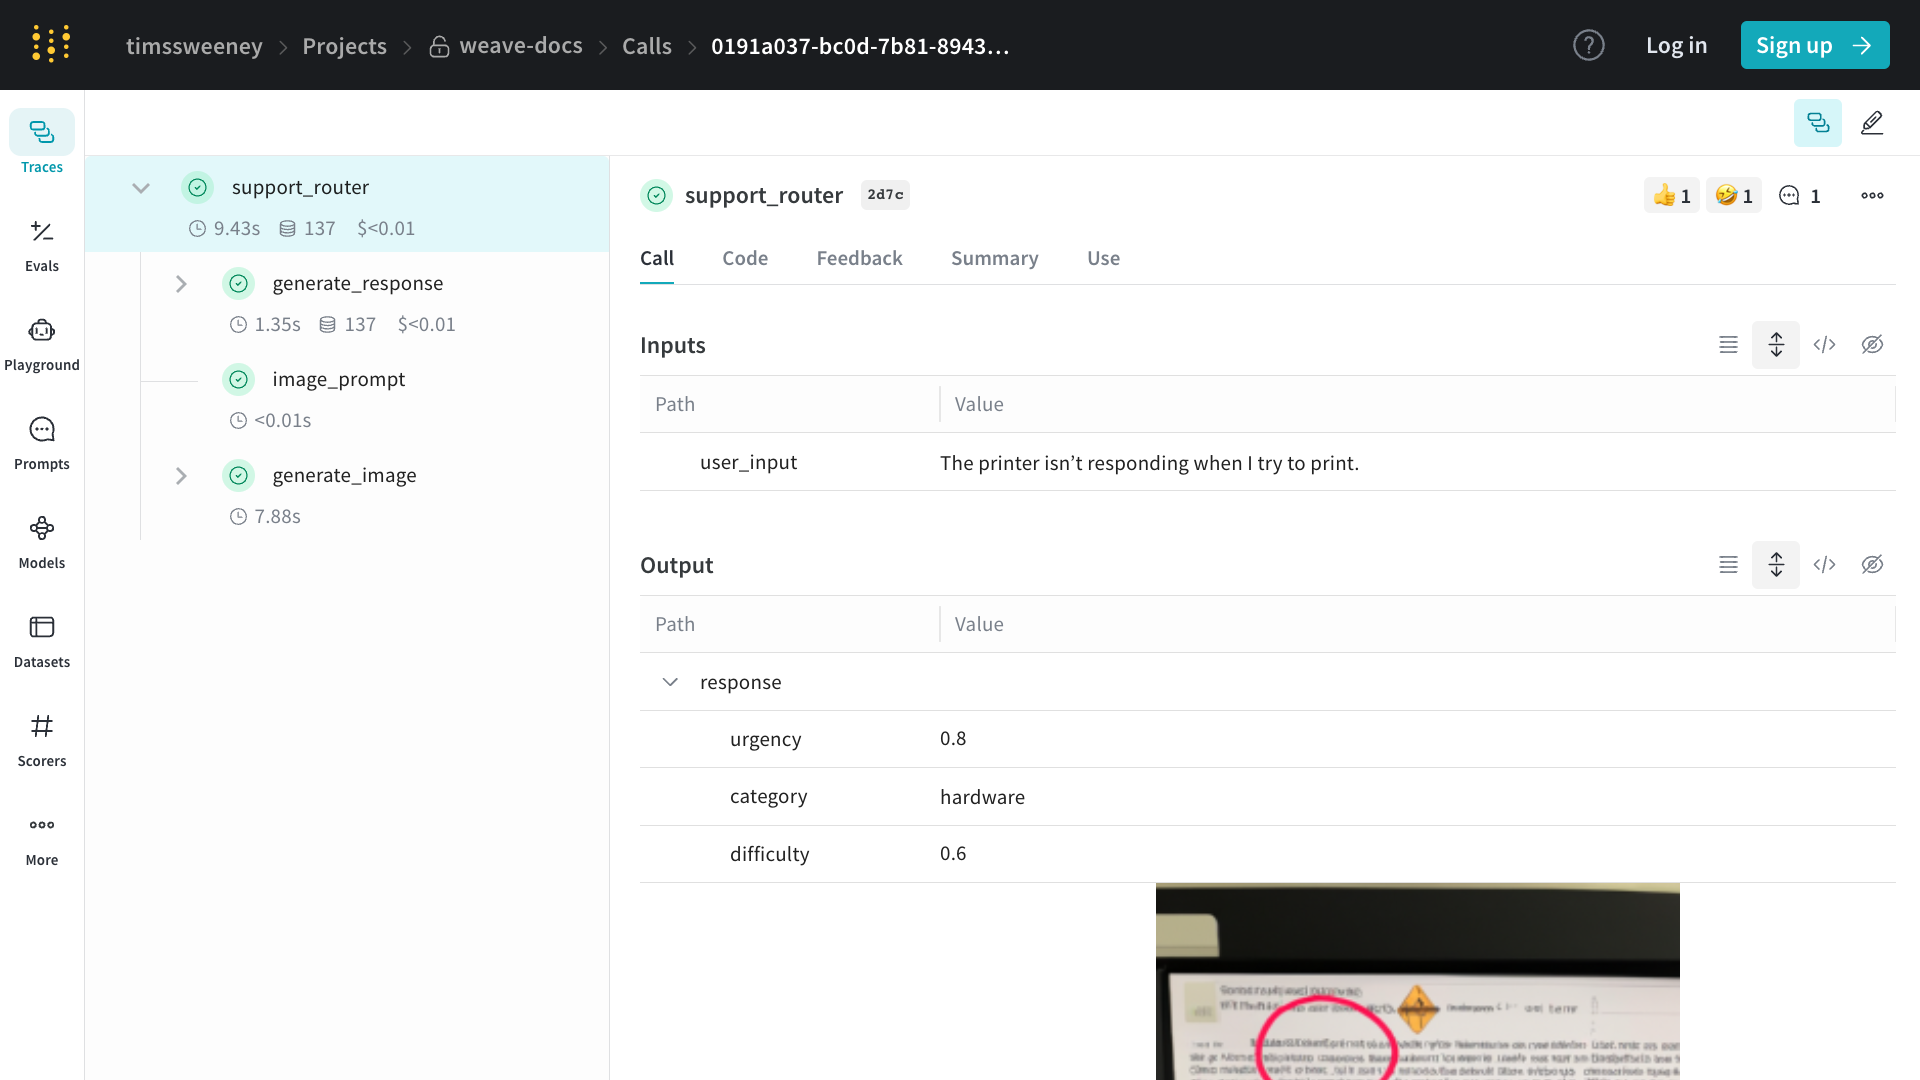
- 통화를 클릭하여 세부 정보 페이지 열기

통화 업데이트
통화는 생성된 후에는 대부분 변경할 수 없지만, 지원되는 몇 가지 변경 사항이 있습니다: 이러한 모든 변경은 통화 세부 정보 페이지로 이동하여 UI에서 수행할 수 있습니다:
표시 이름 설정
- Python
- TypeScript
- HTTP API
통화의 표시 이름을 설정하려면
Call.set_display_name 메서드를 사용할 수 있습니다.showLineNumbers
피드백 추가
자세한 내용은 피드백 문서를 참조하세요.통화 삭제
- Python
- TypeScript
- HTTP API
Python API를 사용하여 통화를 삭제하려면
Call.delete 메서드를 사용할 수 있습니다.showLineNumbers
여러 통화 삭제
- Python
- TypeScript
Python API를 사용하여 통화 배치를 삭제하려면 통화 ID 목록을
delete_calls()에 전달하세요.showLineNumbers
통화 쿼리 및 내보내기
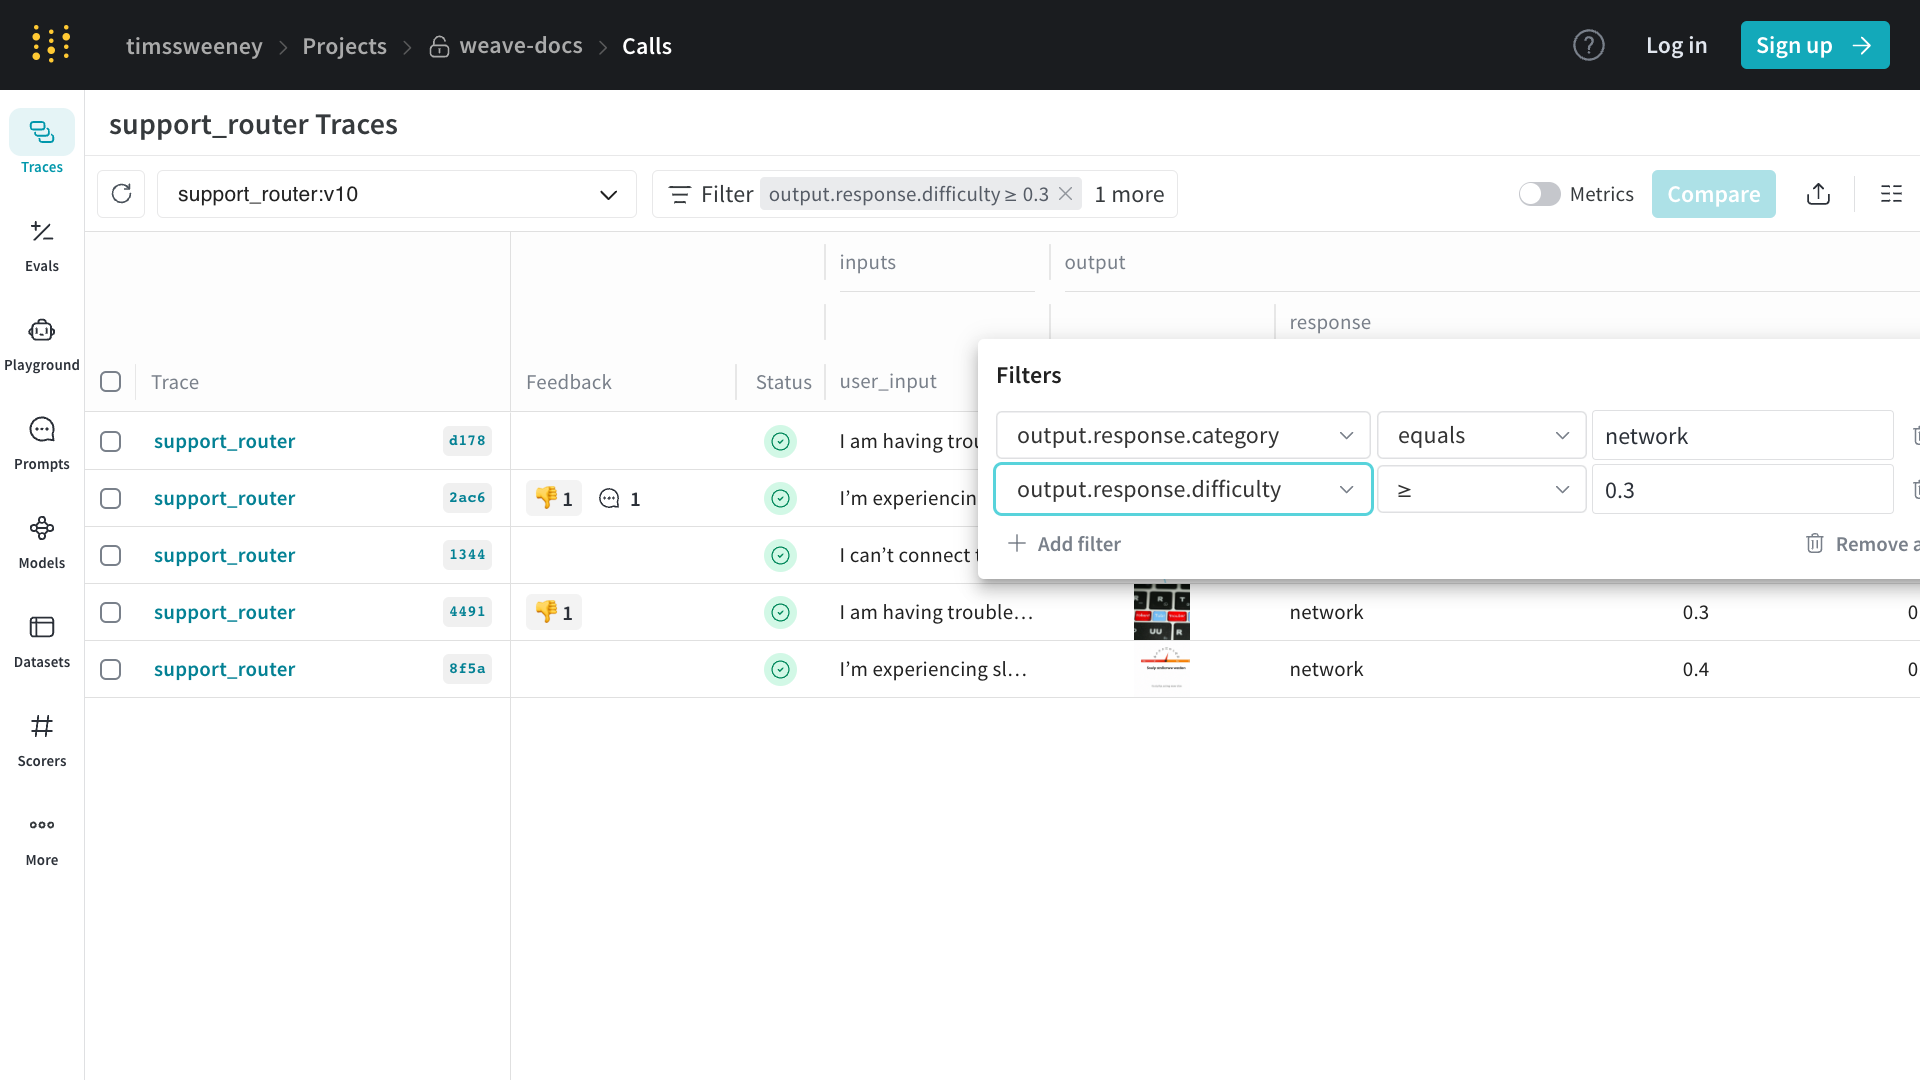
프로젝트의 /calls 페이지(“Traces” 탭)에는 프로젝트의 모든 통화에 대한 테이블 뷰가 포함되어 있습니다. 여기에서 다음을 수행할 수 있습니다:
- 정렬
- 필터링
- 내보내기
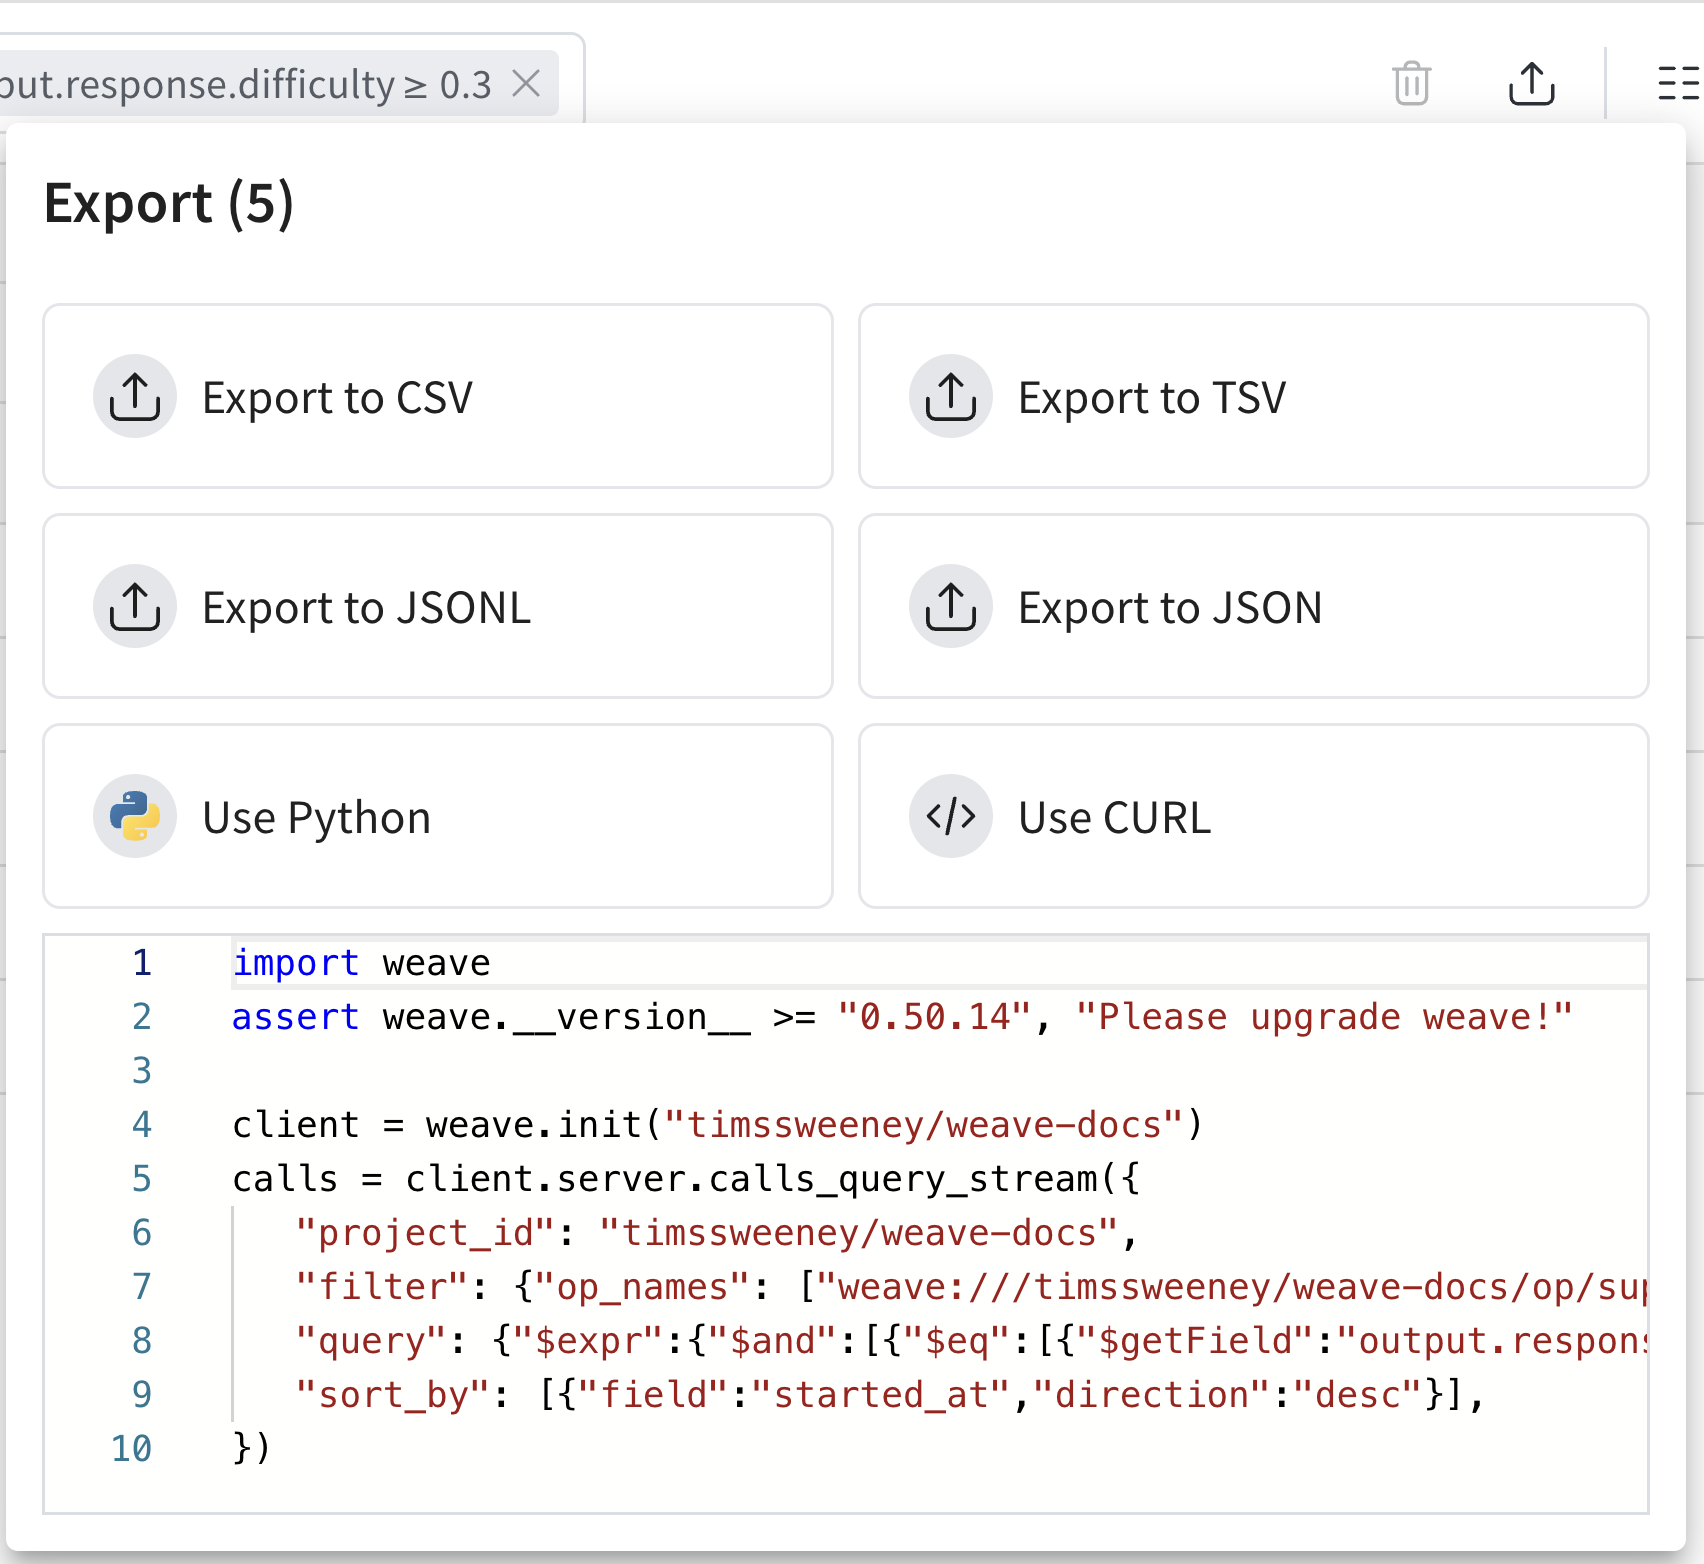 내보내기 모달(위에 표시됨)을 사용하면 여러 형식으로 데이터를 내보낼 수 있으며, 선택한 통화에 대한 Python 및 CURL 등가물도 보여줍니다!
가장 쉬운 시작 방법은 UI에서 뷰를 구성한 다음 생성된 코드 스니펫을 통해 내보내기 API에 대해 자세히 알아보는 것입니다.
내보내기 모달(위에 표시됨)을 사용하면 여러 형식으로 데이터를 내보낼 수 있으며, 선택한 통화에 대한 Python 및 CURL 등가물도 보여줍니다!
가장 쉬운 시작 방법은 UI에서 뷰를 구성한 다음 생성된 코드 스니펫을 통해 내보내기 API에 대해 자세히 알아보는 것입니다.
- Python
- TypeScript
- HTTP API
Python API를 사용하여 통화를 가져오려면
client.get_calls method:통화 스키마
전체 필드 목록은 schema를 참조하세요.| 속성 | 타입 | 설명 |
|---|---|---|
| id | string (uuid) | 통화의 고유 식별자 |
| project_id | string (선택 사항) | 관련 프로젝트 식별자 |
| op_name | string | 작업 이름(참조일 수 있음) |
| display_name | string (선택 사항) | 통화의 사용자 친화적 이름 |
| trace_id | string (uuid) | 이 통화가 속한 트레이스의 식별자 |
| parent_id | string (uuid) | 부모 통화의 식별자 |
| started_at | datetime | 통화가 시작된 타임스탬프 |
| attributes | Dict[str, Any] | 통화에 대한 사용자 정의 메타데이터 (실행 중에는 읽기 전용) |
| inputs | Dict[str, Any] | 통화의 입력 매개변수 |
| ended_at | datetime (선택 사항) | 통화가 종료된 타임스탬프 |
| exception | string (선택 사항) | 통화가 실패한 경우 오류 메시지 |
| output | Any (선택 사항) | 통화 결과 |
| summary | Optional[SummaryMap] | 실행 후 요약 정보. 실행 중에 이를 수정하여 사용자 정의 메트릭을 기록할 수 있습니다. |
| wb_user_id | Optional[str] | 연결된 Weights & Biases 사용자 ID |
| wb_run_id | Optional[str] | 연결된 Weights & Biases 실행 ID |
| deleted_at | datetime (optional) | 해당되는 경우 호출 삭제 타임스탬프 |
- The
id,trace_id, andparent_idfields help in organizing and relating calls within the system. - Timing information (
started_at,ended_at) allows for performance analysis. - The
attributesandinputsfields provide context for the call. Attributes are frozen once the call starts, so set them before invocation withweave.attributes.outputandsummarycapture the results, and you can updatesummaryduring execution to log additional metrics. - Integration with Weights & Biases is facilitated through
wb_user_idandwb_run_id.
- 비용
- 지속 시간
- 상태
저장된 뷰
Trace 테이블 구성, 필터 및 정렬을 저장된 뷰로 저장하여 선호하는 설정에 빠르게 접근할 수 있습니다. UI와 Python SDK를 통해 저장된 뷰를 구성하고 접근할 수 있습니다. 자세한 내용은 Saved Views를 참조하세요.Traces 테이블에서 W&B 실행 보기
Weave를 사용하면 코드의 함수 호출을 추적하고 이를 실행된 W&B runs에 직접 연결할 수 있습니다. wandb.init() 컨텍스트 내에서 @weave.op()로 함수를 추적하고 호출하면, Weave는 자동으로 해당 추적을 W&B 실행과 연결합니다. 관련된 모든 실행에 대한 링크는 Traces 테이블에 표시됩니다.Python 예제
다음 Python 코드는 추적된 작업이wandb.init() 컨텍스트 내에서 실행될 때 W&B 실행에 어떻게 연결되는지 보여줍니다. 이러한 추적은 Weave UI에 나타나며 해당 실행과 연결됩니다.
-
터미널에서 종속성 설치:
-
W&B에 로그인:
-
스크립트에서
your-username/your-project를 실제 W&B 엔티티/프로젝트로 바꿉니다. -
스크립트 실행:
- 방문 https://weave.wandb.ai하여 프로젝트를 선택합니다.
- Traces 탭에서 추적 출력을 확인합니다. 관련된 모든 실행에 대한 링크는 Traces 테이블에 표시됩니다.
자동 패치 구성
기본적으로 Weave는openai, anthropic, cohere, 및 mistral와 같은 일반적인 LLM 라이브러리에 대한 호출을 자동으로 패치하고 추적합니다.
이 동작은 autopatch_settings 인수를 사용하여 weave.init에서 제어할 수 있습니다.
모든 자동 패치 비활성화
showLineNumbers
특정 통합 비활성화
showLineNumbers
입력 및 출력 후처리
자동 패치 중에 입력 및 출력(예: PII 데이터)을 후처리하는 방법을 사용자 정의할 수도 있습니다:showLineNumbers
FAQs
대용량 추적이 잘리지 않게 하려면 어떻게 해야 하나요?
자세한 내용은 Trace data is truncated를 Troubleshooting guide에서 참조하세요.추적을 비활성화하려면 어떻게 해야 하나요?
환경 변수
전체 프로그램에 대해 무조건 추적을 비활성화하려는 상황에서는 환경 변수WEAVE_DISABLED=true를 설정할 수 있습니다.
클라이언트 초기화
때로는 특정 조건에 따라 특정 초기화에 대해 추적을 조건부로 활성화하고 싶을 수 있습니다. 이 경우 초기화 설정에서disabled 플래그로 클라이언트를 초기화할 수 있습니다.
컨텍스트 관리자
마지막으로, 일부 애플리케이션 로직에 따라 단일 함수에 대한 추적을 조건부로 비활성화하고 싶을 수 있습니다. 이 경우with set_tracing_enabled(False) 컨텍스트 관리자를 사용할 수 있으며, 이는 weave.trace.context.call_context에서 가져올 수 있습니다.
Call에 대한 정보를 캡처하려면 어떻게 해야 하나요?
일반적으로 op를 직접 호출합니다:call 메서드를 호출하여 call 객체에 직접 접근할 수도 있습니다:
call 객체는 입력, 출력 및 기타 메타데이터를 포함하여 호출에 대한 모든 정보를 가지게 됩니다.